
In addition to creating rate schedules through the standalone eModule tool or the API, users may also build and edit rate schedules directly within Docs. Users with the "Rates Library Maintainer" permission will be able to build and amend schedules, available through the Products & Rates>Build New Rate Schedule link.
This article described how to build a new Rate Schedule, and how to Edit an existing schedule in the Rate Schedule Library. Rate Schedules uploaded via the API or eModule can be edited using the Rate Schedule editor, and those built directly in Docs can be extracted and modified using both the API and the eModule.
Build a New Schedule
Accessing the Tool
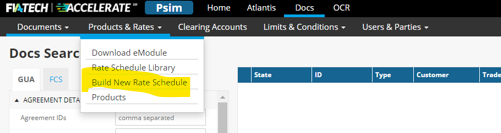
All rate schedules can be built and edited via the Rate Schedule library. To build a NEW rate schedule, access "Build New Rate Schedule" in the "Products & Rates" dropdown menu, as shown below.
You can also select "Build New" from the Rate Schedule Library to create a new rate schedule.

Assigning Rate Schedule Name
Prior to building your new schedule, you must specify a name for your schedule, along with the party you are creating the schedule for.
Within the "Build a new Rate Schedule" popup, name your new schedule, specify which of your parties to link the schedule to (noting that only one party may be selected), and select the party roles for which the schedule should be available. Once specified, select "Create Rate Schedule".

Creating the First Rate Lines
Within the New Schedule Builder, you have the option of creating an entirely new schedule from a blank template, by selecting "Add your first line" OR starting from a previously created rate schedule by selecting a schedule from the "Start from an existing Rate Schedule" dropdown. To note, starting from an existing schedule will not update the selected schedule, it will simply insert the rate lines from the referenced schedule into your new schedule.

Building a Rate Line
When you select "Add your first line", or anytime "Add Line" is chosen, a new rate line will be added to your rate schedule. Starting from the leftmost field, use the dropdowns to specify the desired rate line details, referencing the Docs Product Report as needed to confirm product reference data.
You must select your product information prior to specifying the rate information. A region must be specified before you can select your exchange, and once the latter has been selected you will be able to choose the product group.
Once the rate is entered, select "Save" on the lower left of the rate row to add the information to your rate schedule. Note that you must select "Save" for the changes made to your schedule to be saved to the system.

Once you have specified all the information for the first rate row, the "+" signs will become activated. These can be used to add an additional row. All the information to the left of the selected row will be copied into the line below. For example, to add an additional execution method for a single product, select the "+" below the Exec Type field. This will allow you to specify an additional execution method for the product.

Edit an Existing Schedule
The Rate Schedule Builder also supports amending existing schedules that have been added to your Rate Schedule Library.
If the schedule you would like to edit is not currently available within the Rate Schedule Library, select "Upload eModule", select the desired file for upload, and follow the steps for adding the file (detailed in the Upload a New Rate Schedule section of the Rate Schedule Library article). If your desired schedule is already available within the library, simply select the blue hyperinked Rate Schedule name to begin editing.

This will open the Rate Schedule Builder tool detailed in the previous section, allowing you to add and edit rate lines, after which you may save the new lines and updated schedule.
To edit an existing rate row, select the "pencil" icon to the left of the row, this will allow you to make changes to the data already in the rate schedule.

If desired, you may use the "Download Schedule" button to download an eModule formatted version of your schedule.

Validations
Prior to saving a rate line, the system will identify missing required fields by surrounding the dropdown field in red, as shown in the Currency field below:

Additionally, invalid data entries will be identified when saving rate lines.
Supported Rate Types
For the introduction of the in-application Rate Schedule Builder, advanced rate types of Volume Discounts and Banding are not available. These rate types will continue to be available and manageable through the eModule, with plans to include in the application-based tool as part of a future release.
Additional Information
Additional information on Rate Schedule management tools, including details on the Rate Schedule Library, eModule, and API integration may be found within the Docs Help Center.
Comments
0 comments
Article is closed for comments.